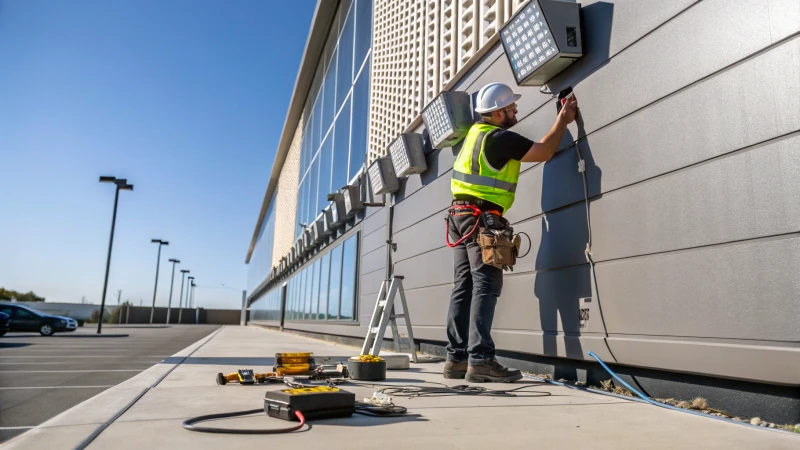
%[A homeowner installing LED flood lights on a house exterior at dusk.]
Ever tried to light up your backyard with LED flood lights? It's easier than you think!
Installing LED flood lights involves several key steps, including selecting the right location, ensuring proper mounting, wiring, and testing. Follow safety guidelines for electrical connections, use the appropriate tools, and consider the light's IP rating for outdoor installations. Proper installation ensures energy efficiency, safety, and optimal performance.
I remember the first time I decided to spruce up my outdoor space. It was just a regular Saturday afternoon when I realized how much better my garden would look with a little extra lighting. So, I decided to tackle the project myself. With a checklist in hand—location, power supply, tools—I felt like an electrician on a mission. Let me share my step-by-step journey, hoping it’ll save you some time and possibly a few frustrating moments.
LED flood lights enhance outdoor security.True
LED flood lights provide bright illumination, deterring potential intruders.
You don't need tools to install LED flood lights.False
Tools are required for mounting brackets and securing the lights.
What Tools and Materials Do You Need for Installation?
I remember the first time I tackled an installation project—it felt like embarking on a grand adventure. Armed with the right tools, the task became an exciting journey instead of a daunting chore.
For any installation project, having a drill, screwdriver, and wrench is crucial. You'll also need screws, mounting brackets, and wiring. Don't forget safety gear like gloves for protection during the process.

Essential Tools for Installation
I’ve learned that having the right tools can make or break an installation project. Picture this: you're in the middle of mounting something, and you realize you're missing a screwdriver. Suddenly, what should be a smooth process turns into an ordeal. Here's my go-to list of tools:
- Drill: Whether it's hanging a picture frame or installing shelves, a drill is your best friend.
- Screwdriver: I can’t tell you how often this little tool has saved my day, ensuring everything is securely fastened.
- Wire Cutters: Perfect for when you're dealing with electrical installations or just need to snip some wires to the right length.
- Voltage Tester: This one’s crucial for safety—make sure all electrical connections are safe.
- Level: There's nothing more satisfying than seeing your work perfectly aligned.
- Wrench: Essential for tightening those stubborn nuts and bolts that just won't budge.
Necessary Materials for Installation
Having the right materials is just as important as having the right tools. Imagine having everything ready but missing a crucial piece like a mounting bracket. Here’s a list to keep you prepared:
| Material | Purpose |
|---|---|
| Mounting Bracket | Secures fixtures to surfaces |
| Screws | Fastens materials together |
| Wiring | Connects electrical components |
| Electrical Connectors | Joins wires safely |
| Conduit | Protects wiring from environmental damage |
Safety Gear
Safety has to be a top priority. I remember a friend who skipped safety gear once, thinking he’d be fine—he ended up with a minor shock. So now, I never start without my:
- Insulated Gloves: These keep me safe from unexpected electrical surprises.
- Safety Goggles: A must-have to protect your eyes from flying debris.
- Hard Hat: Especially important if you’re working in a construction zone where things could fall.
Preparing the Workspace
Before diving into any installation task1, I always make sure my workspace is clean and organized. Trust me, it saves time and reduces stress when you know exactly where everything is. Plus, it minimizes accidents—a clutter-free space is a safe space.
Importance of Planning
Planning might sound tedious, but it’s the secret to a smooth installation process. I create a checklist of all tools and materials needed, considering factors like location and power supply compatibility. This strategy not only keeps things efficient but ensures I'm ready for any curveballs that might come my way.
A drill is essential for creating holes in walls.True
Drills are used to make holes, crucial for mounting fixtures.
Insulated gloves are optional for electrical installations.False
Insulated gloves protect against shocks, making them essential.
How Do You Choose the Best Location for Your LED Flood Lights?
Have you ever struggled to figure out where to place your LED flood lights for the best effect?
To choose the best location for your LED flood lights, focus on the lighting area, mounting height, environmental conditions, and power supply. These factors are crucial for effective illumination, enhancing both security and aesthetics in your space.

Consider the Lighting Area
I remember once standing in my backyard with a flashlight, trying to envision how a flood light would brighten up the space. It's essential to identify which areas you want illuminated. Whether it's a cozy patio or a sprawling commercial lot, the goal is to cover important zones without leaving any corners in shadow. Using a lighting calculator2 can really help you determine the necessary lumens for your area.
Evaluate Mounting Height
The first time I tried to set up flood lights, I ended up temporarily blinding myself. It turns out, the mounting height plays a huge role! If they're too low, you might get that blinding glare; too high, and they just don’t cut it. Typically, placing them between 10 and 20 feet high works wonders for most settings. Here's a quick guide I use:
| Mounting Height | Ideal Application |
|---|---|
| 10-12 feet | Residential driveways |
| 15-20 feet | Commercial parking lots |
| Above 20 feet | Industrial premises |
Analyze Environmental Conditions
Weather can be unpredictable. Once, during a rainy season, my newly installed lights fizzled out because they weren’t weatherproof. So now I always check for the right IP ratings3 to ensure they can withstand rain and dust. And if you're near the coast, trust me, corrosion-resistant materials are worth it.
Check Power Supply Compatibility
When I first ventured into this lighting journey, I learned the hard way about matching power supply voltages. In residential areas, 110V is common, but if you're dealing with industrial setups, you might need 220V or more. I've found consulting with an electrician4 invaluable—they can point out things I would've missed.
Plan for Accessibility and Maintenance
One thing I've learned over time is that it's crucial to place your LED flood lights where you can easily reach them for maintenance. Cleaning them regularly and adjusting their angles as needed keeps everything running smoothly. Following maintenance guidelines5 helps me keep them efficient and long-lasting.
By keeping these factors in mind, you not only enhance safety but also boost the visual appeal of your space with well-placed LED flood lights.
Mounting height affects LED light spread.True
The height influences the spread and intensity of illumination.
Residential areas require 220V LED flood lights.False
Typically, residential areas use 110V for LED flood lights.
How Can I Wire LED Flood Lights Safely?
Remember that time I tried to set up a new gadget without reading the manual? Wiring LED flood lights is just like that—except this time, I’m doing it right.
To wire LED flood lights safely, I first choose a suitable location, check power compatibility, gather tools, mount securely, make precise connections, test the setup, and do a final safety check.

Preparing for Installation
Selecting the Right Location: So, I find myself squinting at shadows in my backyard, dreaming of turning night into day with some LED flood lights. First things first: where to put them? It’s all about finding that sweet spot. I consider where the light will shine best and keep in mind any weather challenges—like the relentless wind or the unexpected downpour. It’s not just about lighting up the space; it’s about making sure these lights last.
Ensuring Power Compatibility
Next up is ensuring the power supply matches the LED flood light's needs. This isn’t the time for surprises. I’ve learned that checking voltage compatibility with my local power grid is crucial—otherwise, I might end up with a pretty expensive paperweight. A voltage tester becomes my trusty sidekick in this endeavor.
Gathering Tools and Materials
| Tools | Materials |
|---|---|
| Insulated gloves | LED flood light |
| Drill | Mounting bracket |
| Screwdriver | Appropriate wiring |
| Wire cutters | Conduit (if needed) |
| Voltage tester | Electrical connectors |
| Level | |
| Wrench |
Armed with insulated gloves and absolute certainty that the power is off, I dive in.
Mounting the LED Flood Light
Mounting Bracket Installation: With the bracket in hand, it’s time to play real-life Tetris. I secure it using screws or bolts, making sure everything is level (because nobody wants a lopsided beam of light). For those larger-than-life setups, heavy-duty mounts6 are my go-to.
Making Wiring Connections
- Turn Off Power: The mantra here is simple—no power, no shock.
- Connect Wires: Wire nuts or connectors in hand, I join the wires with precision. Outdoor setups demand extra love—insulation and weatherproofing are non-negotiable.
- Grounding: Connecting that ground wire is like putting on my seatbelt—safety first.
- Seal for Weather Protection: Silicone seals or weatherproof connectors[^2] keep moisture and corrosion at bay.
Testing and Adjusting
- Test Wiring: Out comes the voltage tester again to confirm all is well.
- Turn On Power: Flicking the switch at the breaker, I hold my breath and watch the magic unfold.
- Adjust Angle: With a wrench or screwdriver, I tweak the angle until everything looks just right—no more dark corners!
Conducting a Final Safety Check
I double-check every connection and fixture, ensuring all is secure and weatherproof. Consistent maintenance helps too—I keep an eye out for dust or dirt that could dull the shine.
For more insights on LED lighting solutions7, explore various options to fit your needs perfectly.
LED flood lights require IP65 rating for outdoor use.True
IP65 rating ensures protection against dust and low-pressure water jets.
Using wire nuts is optional for LED flood light wiring.False
Wire nuts are necessary to ensure secure and insulated connections.
How Can You Make Sure Your LED Flood Lights Are Weatherproof?
Have you ever stared at your LED flood lights during a storm, wondering if they'll make it through? Let's make sure they can handle whatever Mother Nature throws their way.
To ensure your LED flood lights are weatherproof, opt for models with high IP ratings like IP65 or IP66, apply silicone seals on connectors, and regularly check for any damage. Proper installation and maintenance are key to keeping them durable.
%[LED flood lights illuminating a garden area at twilight]
Understanding IP Ratings
So, here's the deal: when it comes to weatherproofing those LED flood lights, the first thing I had to wrap my head around was the IP ratings8. Think of it as the armor for your lights against dust and water. I remember standing in the store, overwhelmed by numbers until I learned that IP65 or higher is the way to go for outdoor lights. An IP65 rating means it's dust-tight and protected against water jets, while IP66 is like having an extra shield against powerful water jets.
Selecting the Right Fixtures
Choosing the right fixture can feel like picking the perfect outfit—it has to be just right. When I was on my quest for the best LED flood lights, I looked for those specially made for outdoor use. They're like superheroes with built-in seals and gaskets to keep water out. And let's not forget the housing—aluminum or stainless steel are your best friends here. I found it helpful to compare models in a simple table to see which ones would suit my needs:
| Feature | Model A | Model B | Model C |
|---|---|---|---|
| IP Rating | IP65 | IP66 | IP67 |
| Housing Material | Aluminum | Stainless Steel | Plastic |
| Price | $$ | $$$ | $ |
Installation Techniques
Installation can make or break your weatherproofing efforts. I learned this the hard way after mistakenly placing a light in a low spot that turned into a puddle. Now, I always pick a higher location and use sturdy brackets for a secure mount. A level9 is crucial to keep things aligned properly.
Wiring and Connections
Getting the wiring right is something I can't stress enough. I always use weatherproof electrical connectors and seal them with silicone or rubber gaskets—trust me, water finds its way into everything if you're not careful. Adding heat-shrink tubing for insulation gives me peace of mind. For detailed wiring guidelines, I suggest looking into a professional guide10.
Regular Inspection and Maintenance
Just like I check my car's oil regularly, inspecting my lights has become a habit. It's worth it because spotting cracks or loose wires early on saves me headaches down the road. Cleaning them regularly also prevents dust from compromising seals. When something's damaged, replacing it immediately is a lesson I've learned to follow strictly.
Incorporating Smart Control Systems
Now, for the tech lovers out there—incorporating smart lighting systems11 is like having a personal assistant for your lights. These systems keep tabs on potential issues or changes in environmental conditions that might affect performance. It's an investment in convenience and longevity that I've found invaluable.
IP65-rated lights are dust-tight and water jet protected.True
IP65 means the fixture is dust-tight and protected against water jets.
Plastic housing is ideal for weatherproof LED flood lights.False
Plastic is less durable than aluminum or stainless steel for outdoor use.
Conclusion
Learn how to easily install LED flood lights with essential tools, safety tips, and proper techniques for optimal placement, wiring, and weatherproofing to enhance your outdoor space.
This link offers valuable tips on organizing your workspace, crucial for efficient and safe installations. ↩
A lighting calculator helps determine the appropriate lumens required based on area size, ensuring adequate illumination. ↩
Understanding IP ratings helps select lights that withstand specific environmental conditions like dust and moisture. ↩
An electrician can ensure your lighting system complies with local electrical codes and prevents safety hazards. ↩
Regular maintenance checks ensure optimal performance and longevity of your lighting system. ↩
Heavy-duty mounts provide stability for large installations, crucial for enduring harsh conditions. ↩
Discover diverse LED solutions tailored to enhance energy efficiency and lighting effectiveness. ↩
Explore this link to learn how IP ratings work and why they matter for outdoor lighting durability. ↩
Learn how to use a level tool to ensure your flood lights are mounted perfectly. ↩
Follow this comprehensive guide to correctly wire LED flood lights and avoid common mistakes. ↩
Discover how smart lighting systems can improve the functionality and maintenance of your LED flood lights. ↩